Author: Ludovic Vilbert

  • Hempcrete: Plastic-free walls for Plastic Free July

    Hempcrete: Plastic-free walls for Plastic Free July

    Every July, millions of people take part in Plastic Free July, looking at ways to reduce plastic waste in their homes and daily lives. It is an important reminder that our choices matter, but in the world of building design, plastic can be harder to spot.

    Close-up of a pressed straw bale, showing a dense, textured surface made of compressed straw pieces in yellow and brown—an ideal inspiration for plastic-free walls during Plastic Free July, with natural fibres tightly packed together.

    Hempcrete wall close up

    When we think of reducing plastic waste, we often start with straws, packaging, or shopping bags. But the built environment, particularly how we construct our homes, is one of the largest and least visible contributors to plastic use.

    In most modern houses, plastic membranes, synthetic insulation wraps, and petrochemical sealants are hidden behind every finished surface. They are there to manage moisture and protect insulation, but they’re not without cost. These materials are energy-intensive to produce, hard to recycle, and often compromise indoor air quality.

    This Plastic Free July, we are spotlighting a different approach: building with hempcrete, a breathable, carbon-storing, and plastic-free wall system that supports healthy, sustainable homes.

    What Is hempcrete?

    Hempcrete is a natural building material made from hemp hurd (the woody core of the hemp plant), lime binder, and water. It’s mixed on site and cast in place around a timber frame, where it cures into a light yet solid insulating mass.

    Unlike synthetic wall systems, hempcrete is vapour-permeable, meaning it allows moisture to move through it without trapping condensation. It also offers high thermal mass, acoustic insulation, fire resistance, and natural pest resistance, all without the need for plastic vapour barriers.

    See our other blogs about hempcrete construction: Hands-on with Hempcrete and Hemp: Houses that breathe so you can too.

    Plastic-free construction, by design

    In most conventional homes, plastic wraps are used to manage moisture and improve thermal performance. But these materials are not biodegradable, and over time they can degrade, tear, or contribute to poor air quality inside the home.

    With hempcrete, we do not need synthetic barriers. The material naturally balances humidity and temperature, creating a stable and comfortable indoor environment.

    A large black rectangular container is filled with light brown shredded or ground material, possibly hempcrete or woodchips, with two small metal pipes attached to one side near the bottom—ideal for plastic-free walls this Plastic Free July.
    Wearing gloves and a blue hoodie, a man empties hempcrete—a sand-like material for plastic-free walls—into a black container on wheels, likely at a construction or work site.
    Close-up of a wall made from compressed straw or hempcrete, showing its rough, fibrous texture and unfinished window opening with sunlight casting shadows—an inspiring example of plastic-free walls for Plastic Free July.
    A construction site with unfinished hempcrete walls, two yellow saw horses, a wooden ladder, and building materials scattered on the floor. Sunlight filters in through an open window—a step towards plastic-free walls for Plastic Free July.
    A partially constructed building wall with timber framing and a section covered in light-coloured hempcrete render, showcasing plastic-free walls. Sunlight and trees are visible in the background, reflecting the spirit of Plastic Free July.

    Photo from a site visit of one of our residential projects in Hillwood, Tasmania built using hempcrete.

    On a recent project here in Lutruwita/Tasmania, we used a wall system that eliminates plastic membranes altogether, relying instead on the intelligent moisture buffering of hempcrete walls. The result? A low-tox, low-waste, high-performance envelope that breathes.

    Sustainable building starts with materials

    At Inwardout Studio, we believe good design is about more than just aesthetics. It is about systems that respect the environment, and the people who live in them.

    Hempcrete ticks many of the boxes we care about:

    • Made from renewable, regenerative resources
    • Sequesters carbon during growth and curing
    • Fully compostable or recyclable at end of life
    • Naturally insulates without the need for petrochemical foams
    • Reduces construction waste by simplifying the wall system

    Every material choice sends ripples far beyond the building site. Choosing natural building materials like hempcrete is notjust about reducing waste, it’s about creating homes that support well-being, biodiversity, and climate resilience.

    Let’s build differently

    This Plastic Free July, take a closer look at the materials behind your walls. Could hempcrete be part of your next renovation or new build?

    We are always happy to chat about low-impact design, healthy materials, and how to make your home more future-friendly.

    Got questions about hempcrete? Drop us an email, we would love to hear what you are planning.

    #PlasticFreeJuly #Hempcrete #NaturalBuilding #LowToxHome #SustainableDesign #PlasticFreeBuilding #BreathableHomes #TasmanianArchitecture #CarbonSmartMaterials #HealthyHomesAustralia #BuildingDesign #BuildingDesigner #NorthernTasmania #Tasmania

  • Hands-on with Hempcrete

    Hands-on with Hempcrete

    Last Friday, I had the opportunity to dive back into the world of hempcrete at a hands-on Hemp Building Practical Workshop near Cressy, Tasmania. Hosted by The Hemp Masonry Company at X-Hemp, it was a fantastic opportunity to reconnect with this incredible material—not just as a designer, but by getting my hands dirty, feeling the mix.

    Having designed buildings with hempcrete before, I know its benefits in theory. However, there is something about actually working with it that brings a deeper appreciation. The process, the texture, the way it sets—it all makes you realise just how special this material is. This was not my first time mixing hempcrete; revisiting the hands-on experience was incredibly rewarding. It reinforced why I believe in this material so much.

    Me temping hempcrete into the wall on a sunny Tasmanian day.

    Me temping hempcrete into the wall on a sunny Tasmanian day.

    A Growing Industry, A Local Opportunity

    The hempcrete industry is growing rapidly in Australia, and we are lucky to have it here in Tasmania. Hempcrete is an amazing, natural building material with huge potential for sustainable, energy-efficient construction. Over the past decade, The Hemp Masonry Company has worked on over 240 residential projects and even some major commercial builds, like the refurbishment of UTAS’s Forestry Building. Seeing hempcrete gain traction here is exciting—it is a step towards a more sustainable building future.

    As Andy Lucas, the Managing Director of X-Hemp, told us during a presentation in front of school kids, this is both a new and old industry. Hemp has been used for centuries in various forms, and now it is making a well-deserved comeback as people seek healthier, more sustainable ways to build.

    The Workshop Experience

    This workshop was not just about watching—it was about doing. We mixed hempcrete ourselves, learning the right balance of hemp hurd, water, lime, and sand. There is a simple joy in testing the mix, squeezing it into a ball to see if it holds together. The process of layering it into formwork, tamping it down, and understanding the best way to build up a strong, well-insulated wall really brought home the craft of it.

    One of the most exciting moments was revealing the finished wall by taking the formwork off. There is always a moment of suspense, wondering how the texture and structure have come together. Seeing the hempcrete take shape, solid yet organic, was truly satisfying.

    One of the coolest parts was experimenting with oxide pigments to colour sections of the wall. The result? A stunning, textured piece that reminded me of a Rothko painting. Who knew hempcrete could be art?

    Why You Should Try It

    If you are a builder, architect, or even just someone interested in sustainable building, I cannot recommend this workshop enough. It is one thing to read about hempcrete, but getting hands-on makes all the difference. Plus, for professionals, it counts towards CPD points.

    If you are curious to learn more or want to get involved in a future workshop, I highly encourage you to reach out to The Hemp Masonry Company at hempmasonry.com.au. This is an industry that’s growing, and now is a great time to be part of it.

    For me, this experience just reinforced why I love working with hempcrete—it is sustainable, practical, and just a joy to build with. And if you ever get the chance to try it yourself, take it—you will not regret it!

    You can also read our blog about working with hempcrete: Hemp: Houses that breathe so you can too

  • Harnessing the Sun: The art of solar passive design

    Harnessing the Sun: The art of solar passive design

    Welcome to our latest exploration into the principles of architecture, where today we are diving right into the heart of solar passive design with a focus on the sun’s pivotal role.

    Below, you will find a quote from one of the masters, accompanied by one of his paintings depicting the sun. This painting portrays the sun with a friendly face, while another suggests we need protection from it.

    Black and white drawing of a split face: one half is a snarling Medusa, the other a calm sun radiating energy—hinting at solar passive design. Text above reads in French and English about disaster and freedom.

    Le Corbusier: Medusa Soleil

    “To introduce the sun is the new and most imperative duty of the architect.”

    Le Corbusier in The Athens Charter 1933

    The Sun: Our most valuable asset

    In the heart of every home lies an untapped ally in our quest for comfort and sustainability—the sun, an ever-present source of light and warmth. At Inwardout Studio, we have always believed in the power of architecture that works with, not against, the environment. Drawing inspiration from nature’s blueprint, we design spaces that are not just buildings but sanctuaries, harmonising with the earth and its rhythms.

    The sun, a perpetual source of energy and light, offers more than just daylight. It is the cornerstone of solar passive design, a principle that guides our design ethos. It is not just about placing windows for the best view; it is about understanding the sun’s path, the local climate, and how a building can optimise these elements for thermal comfort, energy efficiency, and a smaller carbon footprint.

    Imagine a home that breathes with the seasons—cool and serene during the blistering summer heat, warm and inviting as the winter chill sets in. This vision is achievable through strategic orientation, thoughtful window placement, and materials that capture and store the sun’s warmth or shield us from its excess.

    Principles of passive solar design

    1. Orientation: The first step towards energy efficiency The journey to effective passive solar design begins with orientation. By thoughtfully positioning a building with its main windows facing north (in the southern hemisphere) or south (in the northern hemisphere), architects and building designers can capture optimal sunlight during the winter months, reducing the need for artificial heating. Similarly, incorporating eaves or other shading devices can block the harsh summer sun, keeping our homes naturally cooler.
    2. Thermal Mass: Nature’s temperature regulator Thermal mass is another cornerstone of solar passive design. Materials like concrete, brick, and stone can absorb and store heat from the sun during the day and release it slowly as temperatures drop, maintaining a stable indoor climate. Thoughtfully integrating thermal mass into floors and walls near sun-exposed areas can significantly reduce temperature fluctuations, enhancing comfort and reducing energy use.
    3. Insulation and Glazing: The invisible shields Effective insulation is paramount in passive design. It acts as a barrier, keeping warmth in during the winter and heat out during the summer. Similarly, high-performance glazing on windows can maximise natural light while minimising heat loss and gain. Together, insulation and glazing are the silent guardians of a building’s thermal comfort.
    4. Ventilation: Breathing life into buildings Strategic ventilation further embodies the essence of solar passive design. By encouraging natural air flow from cooler, shaded areas to warmer ones, buildings can effectively ‘breathe’. This not only reduces the need for mechanical cooling but also improves air quality, creating healthier spaces for us to live and work.

    In the illustration below, you can see one of our concept plans for a home in Tasmania indicating the sun’s inclination at noon on the shortest day of the year in the southern hemisphere (21st of June).
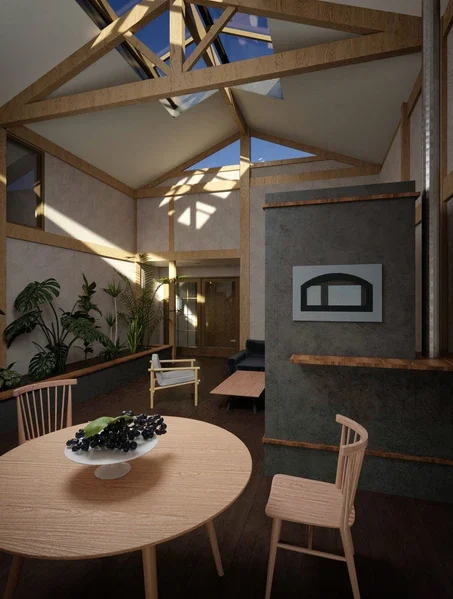
    Diagram of an energy-efficient house illustrating solar passive design, with sun angles in summer and winter, solar panels, high-performance glazing and insulation, thermal mass, and cross ventilation for optimal comfort.

    Passive solar design principles

    In the 3D renders below, you can see two of our design.

    A modern, sunlit living and dining area with large windows that harness the sun through solar passive design, featuring wooden furniture, a fireplace, plants, and two children playing on a rug near toys.
    A bright indoor corridor with large windows and several potted citrus trees lining one side, casting long shadows on the floor. Sunlight streams in, a perfect example of solar passive design that illuminates and warms the inviting space.

    Passive solar home and Hempcrete house sunroom by Inwardout Studio

    Adapting to Tasmania’s latitude

    An essential aspect of solar passive design is not just harnessing the sun’s energy but also protecting our spaces from its excess. In Tasmania, located at a latitude of approximately 42 degrees south, understanding the sun’s behaviour through the seasons is crucial for optimizing indoor comfort and energy efficiency.

    Below, you can see a sun path related to one of our designs. The house allows the sun to enter, ensuring a cosy winter afternoon.

    A sun path diagram showing a building’s floor plan at the centre, overlaid with blue and red curved lines indicating solar angles and shading patterns for passive design throughout the year. North direction is marked on the diagram.
    Modern building with large glass windows, timber panel cladding, and an angled pergola casting shadows on a concrete walkway; showcasing solar passive design beneath a blue sky with scattered clouds.

    Sun path for the winter sun lounge extension in Tasmania by Inwardout Studio

    Sun protection

    In Tasmania’s case, the angle of incidence—the angle at which the sun’s rays hit the earth—varies significantly between summer and winter. To maximise solar gain in winter, when the sun is lower in the sky, windows should be oriented towards the north (in the Southern Hemisphere) and designed to capture the low-angled winter sun. Conversely, to minimise overheating in summer, when the sun is high in the sky, shading devices like eaves, pergolas, or deciduous trees can be strategically placed to block the high summer sun while still allowing winter sunlight to penetrate.

    Calculating the perfect angle

    In determining the optimal angles for window placement and shading devices for Tasmanian homes, it’s crucial to accommodate the island’s unique solar conditions, spanning latitudes 40°S to 43.5°S. The design goal is to achieve summer shade and winter sunlight according to the sun’s varying path.

    The angle of your timber slats or shading device should be tailored to the sun’s path. A practical starting point for shading is aligning with the latitude angle, roughly 42 degrees south, to match Tasmania’s position. This principle serves as a flexible guideline, suggesting initial angles for timber slats or shading devices but advising adjustments to suit the specific local environment and solar altitude variations throughout the year.

    Embracing local latitude in design

    By embracing Tasmania’s unique latitude in our designs, we ensure that our homes and workplaces not only provide sanctuary from the elements but also leverage them to our advantage. This approach to solar passive design, tailored to the specific conditions of Tasmania, amplifies our commitment for creating spaces that are both sustainable and tuned to the natural environment.

    Landscaping with the sun, food for the plants

    At Inwardout Studio our focus does not stop at the building, we design all our landscape with the sun in mind. Calculating every corner of your block for the best outcome with your new plants.

    Below, you can view the sun diagrams from some of our landscape projects. This is the first step we undertake when commencing a new job.

    A set of four heatmaps showing total hours of sun for a building and its surroundings on 21 March, 21 June, 21 September, and 21 December—ideal for solar passive design. Colours range from blue (low sun) to red (high sun exposure).
    Four diagrams show a building’s floor plan over coloured heat maps, each map representing passive solar exposure for 21 March, 21 June, 21 September, and 21 December. Sunlight ranges from low (blue) to high (red).
    A diagram displays four shadow diagram maps over a building floor plan, each map using red, yellow, and blue to show varying percentages of light exposure across different months—demonstrating key principles of solar passive design with clear legends and labels.

    Sun diagrams for Sylvia’s Sanctuary, Hemp House garden and Perth Primary School by Inwardout Studio

    As we continue to explore and implement solar passive design principles, we invite you to join us in celebrating the sun’s power to create spaces that are not only energy efficient but also harmonious with the beautiful Tasmanian landscape. Let us embark on this journey together, designing homes that protect us from the elements while drawing strength from them.

    Thank you for reading and I hope you enjoyed this blog post. Stay tuned for more!

  • Hemp: Houses that breathe so you can too

    Hemp: Houses that breathe so you can too

    Why should you construct your next home out of hempcrete? And how can Inwardout Studio help you to do that?

    As a building designer, I am always looking for ways to create beautiful, functional and sustainable spaces for our clients. That is why I was intrigued by the idea of using hempcrete for one of our upcoming projects. Read on to learn about my experience using this building material in our design practice, and to find out how it could benefit your build too.

    What is hempcrete?

    Hempcrete is a natural composite made of hemp hurd (the woody core of the hemp plant), lime binder and water. Hemp has many advantages over conventional materials as it is:

    • Carbon negative, meaning it absorbs more carbon dioxide than it emits during its life cycle,
    • Fire resistant, termite resistant and mould resistant,
    • Breathable, allowing moisture to escape and preventing condensation and dampness,
    • Durable, flexible and recyclable, and
    • Possesses excellent thermal and acoustic insulation properties, creating a comfortable and healthy indoor environment.
    A close-up view of a rough, textured beige hempcrete wall surface, showing subtle horizontal lines and variations in colour and texture.
    A close-up view of a rough, textured beige hempcrete wall surface, showing subtle horizontal lines and variations in colour and texture.

    Hempcrete wall close up, showing the hemp finish.

    Hempcrete has been used for thousands of years in various countries. However, the use of hemp is still relatively new in Australia. However, I believe it has great potential to become a mainstream building material in the future, especially as we face the challenges of climate change and resource depletion.

    How did I discover hempcrete?

    I first learned about hempcrete when I was working on a garden design project for a hempcrete house in Westbury, Tasmania. The owners of the house, Sean and Mandy, are a couple who are passionate about sharing their experience of building their own eco-friendly home.

    I was inspired by Sean and Mandy’s story and decided to learn more about hempcrete. I helped Sean on a working bee one afternoon, mixing and temping the hemp for the house walls, which proved to be an invaluable learning experience.

    A construction worker in an orange safety vest kneels on the floor of a partially built, sustainable building. Nearby are bags of materials, buckets, a workbench, and a yellow cement mixer inside the unfinished structure.
    Two metal ladders stand inside a partially constructed, sustainable building with exposed ceiling beams and an unfinished wall. A window opening lets in light, and a shop vacuum rests on the dusty floor—an early stage of creating breathable homes.

    At Sean and Mandy’s house during the hempcrete wall working bee .

    This home’s beauty and simplicity continues to inspire me. The hempcrete walls have a natural texture and colour that blends in so well with the surrounding landscape. The house is warm in winter and cool in summer.

    If you would like to know more about Sean and Mandy’s house-building journey, read their blog. Or visit the house yourself! This couple organise regular eco-tours of their house and garden (the latter which we designed!).

    The Campbell Town Hemp House

    That is why I am excited when I was offered the opportunity to design a hempcrete house for one of my clients in Tasmania. The project is a new build on a rural property. The clients want to create a modern and energy-efficient home that will blend in with the natural surroundings and reflect their commitment to environmental sustainability.

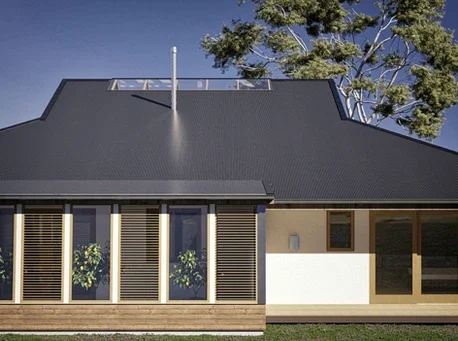
    A modern, single-storey hemp house with a metal roof and solar panel windows in a rural setting, featuring a small porch, outdoor chairs, a water tank, and surrounded by grass under a clear blue sky—perfect for healthy living.
    Modern house with a dark sloped metal roof, large windows with wooden shutters, and a light timber exterior. Designed as a breathable home, it sits beneath a clear blue sky with a tall tree partially visible behind the house.

    3D renders of our design showing the eastern facade (left), and the northern facade with the sun room (right).

    This design includes the following features:

    • Combination of timber framing and hempcrete infill for the walls to provide beautiful finishes
    • Single-storey layout with fully accessible visitor accommodation
    • Charging spot for electric vehicles
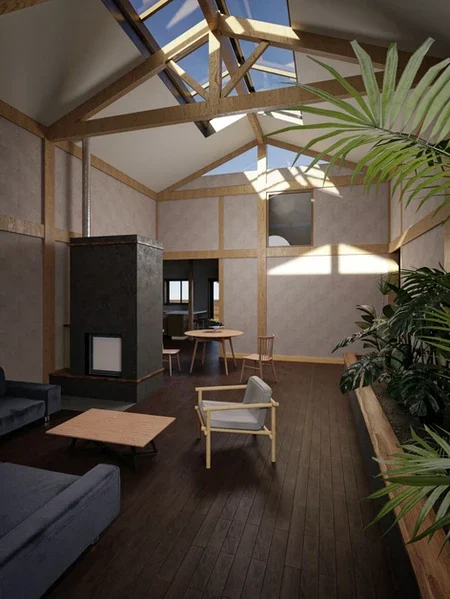
    • Central living area with an indoor garden to bring nature inside
    • Masonry heater place in the centre of the house for a consistent heat during winter
    • Sunroom along the north facade to provide solar gain in winter, with louvres to let the air flow into the house during summer
    • North-facing orientation to maximize solar access and natural light
    • Sloped roof with skylights to enhance ventilation and daylighting
    • Timber floor finish on timber batten for more flexibility (and they feel much better on your knees!)
    • Concrete slab to provide thermal mass, laid over pods made of recycled plastic (much better than the polystyrene ones)
    • Rainwater tank for water supply to the house and veggie garden

    NB. The existing shed on this property was recently updated to include solar panels to provide for this household’s electricity needs.

    Modern living room with high ceilings, skylights, exposed wooden beams, dark wood floors, a fireplace, minimalist furniture, and large indoor plants along one wall—perfect for those who appreciate sustainable building and breathable homes.
    A modern, sunlit living and dining area with wooden beams, large windows, skylights, plants, a wooden table with chairs, a bowl of grapes, and minimalist furniture—showcasing the beauty of sustainable construction and breathable homes.

    3D renders of the centre space showing the masonry heater and the indoor garden.

    Wall Composition: In this project, the wall composition is 90mm of hempcrete on one side, a 90mm timber stud in the middle, and another 90mm of hempcrete on the other side. There is a 10 mm lime render in the outside and inside. It is very important to use a breathable finish for the hemp wall. This design provides both insulation and structural support. The R value of this wall is R3.0.

    Challenges and rewards of designing a hempcrete house?

    Designing a hempcrete house is a rewarding experience for me. I am learning a lot about this innovative material and how to use it effectively. I also enjoy collaborating with the clients, the builder, the Hemp Masonry Company, and other professionals involved in this project. We are lucky here in Tasmania to have a company which grows and processes the hemp for construction, X-Hemp is one of only a small handful of cannabis fibre processing mills operating in Australia, and they claim to be the only 100% female-owned and run hemp facility in the world.

    Designing a hempcrete house also had some challenges. One of them was finding suitable contractors who were familiar with hempcrete construction. Hempcrete is still a relatively new material in Australia, so not many builders have experience working with it. Fortunately, I work closely with an experienced builder in hemp building for this project. Another challenge is dealing with the regulations and approvals for building with hempcrete. Hempcrete is not yet recognised as a standard building material in Australia, so it requires special performance solutions. This can cause delays and extra costs for any project. At this stage, I am still in the process of gaining building approval to ensure compliance with the relevant codes and standards. I will keep you informed of further developments in this space.

    Future plans for designing with hempcrete?

    Designing a hempcrete house is an exciting journey for me. I am proud of the outcome and happy with the feedback from the client. I think hempcrete is an amazing material that has great potential for creating sustainable and beautiful homes.

    I am really looking forward to designing more hempcrete projects in the future. I want to explore different ways of using hempcrete for different types of buildings and contexts. I also want to share my knowledge and experience with other designers and builders who are interested in hempcrete.

    If you want to know more about hempcrete or our work, please visit our website Inwardout Studio. You can also follow us on Facebook and Instagram for updates and inspiration.

    Thank you for reading and I hope you enjoyed this blog post. Stay tuned for more!

    Want more information about hemp?

    For more information about constructing houses made of hemp in Australia, visit the Australian Government’s YourHome website. See also this hemp-themed edition of Sanctuary.

    #hempbuilding #hempcrete #hemp #buildingdesign #hempcretehouse

  • No rest for the ‘wicking’ with these beds

    No rest for the ‘wicking’ with these beds

    What does an old tank and a recycled fence have to do with growing your own food? A lot! If you are interested in doing more with less and saving water that is.

    We spent the recent Recreation Day long weekend making several wicking beds for one of our favourite ‘clients’, Aunty Trish. Trish is renting her home but wanted to get more our of her garden. So we designed a plan featuring containerised plants that could be transported if and when Trish has to move out of that home.

    The heroes of this plan are definitely the wicking beds we made, using two recycled food grade intermediate bulk container (IBC) tanks and several sections of the property’s fence that Trish had salvaged when the landlord replaced it. Trish was keen to grow her own food but wanted a fairly low maintenance set up. The wicking beds have a water reservoir at their base meaning less need to water on a regular basis.

    TIP: You still need to water in plants at establishment to ensure that the soil profile is wet right through and to enable water to move up into the soil profile from the water reservoir.

    Step-by-step illustration showing how two IBC tanks and old fences can be turned into four wicking beds and a bench—no rest for your gardening ambitions—with labelled diagrams detailing each construction stage from tanks to finished planters.
    A garden design plan with labelled proposed features, including gardening beds, compost bins, and trees. Side images show a water tank, wicking beds, a watering diagramme, and two potted olive trees. Plant list and notes are included.

    As well as the IBC tanks and recycled fence palings, we used a premium veggie mix from a local supplier as our soil profile and blue metal screenings in the water reservoir. Ideally we would like to have used scoria in the water reservoir. This volcanic material is porous and has an excellent water holding capacity and air filled porosity. However, it is not readily available in Tasmania, and if it is, is very expensive.

    Two large white plastic water storage containers with metal cages are placed outdoors on a brick surface next to a yellow house and a wooden fence, perfect for transforming into wicking beds amid trees and grass in the background.
    A person stands near a white compost bin at the end of a narrow back garden area, with piles of soil, a hay bale, and three coloured rubbish bins beside a wooden house. Raised garden beds sit nearby, surrounded by trees and a wooden fence.

    Before we filled the wicking beds with these materials, we conducted a test to make sure that there were no leaks in the tanks.

    A large metal wire cage with a square shape is placed on a paved outdoor surface. Inside, an empty, rusted metal container—perhaps once used for wicking beds in gardening—sits upside down. Some grass grows near the cage, finding no rest.
    A person with a red beard and cap measures a wooden plank to build raised garden beds, placing it on top of a large white water tank outdoors beside a house and trees.
    A person wearing work gloves attaches a black corrugated pipe to a white elbow joint whilst kneeling on grass, setting up a self-watering system for garden beds.
    A man wearing a cap uses a yellow spirit level to check the alignment of a large white plastic container with a metal frame, which is being set up as a wicking bed for garden beds on the grass outdoors.
    A person with grey hair leans over a large white plastic container with metal framing, pointing at a red circular object inside. The container, placed on grass outdoors, appears to be used for creating self-watering beds.

    Then we shovelled the screenings into the wheelbarrow, tipped them into the tank, returned to the screening pile and shovelled another barrow load. I think you get the picture! There was a fair bit of shovelling involved, but what a great outcome.

    Below you can also see that we placed the slotted agi (agricultural) pipe) at the base of the tank before we poured the screenings over it. This pipe was attached to a drainage pipe positioned vertically to enable Trish to top up the water reservoir as required. We then covered the screenings with a geotextile fabric that will stop the soil migrating into the water reservoir.

    A person in a white wide-brimmed hat and dark clothing uses a spade to move gravel into a wheelbarrow outside a light-coloured house with red trim and a window, preparing the area for garden beds or self-watering beds.
    A person leans over a large, white plastic container outdoors, holding a black hose inside it—preparing wicking beds for gardening. Another person nearby holds a white PVC pipe amid the grass. There’s no rest in setting up this garden project.
    A man and a woman empty a container of small grey rocks into a large white bin outdoors, preparing materials for wicking beds, with a shed and lush garden beds in the background.
    A person wearing gloves and a hat covers a large outdoor wicking bed with a white sheet in a grassy garden, with laundry hanging on a washing line in the background.

    Then comes the ‘soil’. In this case, we used a premium veggie mix which should get Trish’s vegetables off to a good start. Given this is an organic material, and the plants will take up nutrients from it, this soil profile will need to be topped up over time. That is natural. Well rotted compost should do the trick when the times comes.

    Two people are shovelling soil into a wheelbarrow, hard at work gardening in a narrow outdoor space between two buildings. Next to wicking beds, a wooden fence and green bins sit nearby, with trees and bushes in the background.
    A person wearing a sunhat, gloves, and dark clothes stands on grass, using a spade to move soil into a large plastic container—possibly building wicking beds for gardening with no rest in their dedication.
    A person wearing a mask is pouring dark soil from a black container into a large white self-watering garden bed frame outdoors, with green plants nearby.
    A man stands in a grassy back garden with four large white wicking beds filled with soil. There is a shed, a woodpile, and dense greenery in the background.

    After a bit more shovelling, we were ready to wrap the tank with sections of the old paling fence that were able to be reused. Instead of hiding the tank totally behind timber, we integrated the old palings into its structure. I like the fact that you can still see the original tank structure. It is a bit like the Centre Georges Pompidou, the structure is not hidden but forms part of the aesthetic.

    A person wearing a mask, gloves, and cap lifts an old wooden plank from a stack of weathered boards in a grassy back garden, with tools and greenery visible around them—perhaps preparing materials to build new garden beds.
    A person wearing a cap and mask uses a power drill on wooden planks supported by breeze blocks in a grassy garden, building self-watering garden beds, with more old boards and a pile of timber nearby.
    A person works in a garden, placing wooden planks around a raised wicking bed filled with soil. Two similar gardening beds are nearby, and a wheelbarrow loaded with planks sits in the foreground—there’s no rest from gardening.
    A person kneels on grass, assembling a raised garden bed made from a metal frame and wooden panels, using a power drill. The bed is filled with soil and has a white PVC pipe in the centre, ideal for wicking beds that need no rest between plantings.

    To top it off, we then added a layer of pea straw mulch.

    A woman wearing gloves arranges mulch on top of a raised wicking bed made from a repurposed IBC tank frame, in a grassy back garden surrounded by trees and shrubs.
    A woman tends to a raised garden bed made from a large wooden crate, surrounded by three similar wicking beds filled with mulch, in a green back garden with trees and grass.

    Before and after … ready for planting! Stay tuned for more pics of summer vegie goodness

    A sunny back garden with green grass, a wheelbarrow labelled “Sherlock,” gardening tools, wicking beds beside a tree, a washing line with laundry, and a shed with glass windows. White flowers are blooming on the left.
    A back garden with three wooden wicking beds filled with soil and covered with mulch. Trees and a grassy lawn surround the beds, and a person stands on the right edge holding gardening gloves—there’s no rest for garden enthusiasts!.

    And yes, we know that tomatoes are technically a fruit

    A bientôt!

    #veggies #vegetables #veggiegarden #vegetablegarden #vegetablegardening #growyourown #growyourownfood #growwhatyoueat #garden #gardening #ediblegarden #kitchengarden #gardendesign #gardendesigner #sustainableliving #wickingbeds #raisedbeds

  • Enhancing the greenhouse effect

    Enhancing the greenhouse effect

    We recently built a mini greenhouse to fit on our balcony so that we could get a head start on our summer seedlings.

    Every construction or woodwork project can be thought of as an architectural project, no matter how big or small. I like to use SketchUp to plan my project. SketchUp is a 3D modeling computer program for drawing applications including architectural, interior design, landscape architecture, civil and mechanical engineering, film and video game design. I can draw the project to scale and estimate the materials required.

    Below you can see how I have used SketchUp to develop a design for a mini greenhouse to fit on our north-facing balcony.

    Line drawing of a two-tier plant stand, with rectangular trays on the upper shelf and four round plant pots on the lower shelf, supported by angled legs.

    Concept for our new mini-greenhouse modelled in SketchUp

    After purchasing the materials, I used this sketch to start building the mini greenhouse.

    Two hand-drawn technical sketches of a shelving unit with measurements are placed on a wooden table. Nearby are a pair of pliers, a yellow toolbox, and some scattered water stains on the paper.

    I used 35×70 sections of untreated, non-structural pine certified by the Forest Stewardship Council (FSC) for the frame. After cutting the pieces to size, I stained the timber to fit the aged style of the existing house, and then sealed it with a coat of varnish.

    Several long wooden planks are laid side by side across two wooden saw horses, set on a gravel drive outdoors with trees and brush in the background.
    A wooden workbench outdoors holds stacked planks, a tape measure, a set square, and a green power saw, with gravel ground visible in the background.
    Several pieces of cut wooden timber and rectangular wooden frames are stacked on two saw horses outdoors on a gravel surface, with a traffic cone and other materials visible in the background.
    Several rectangular wooden frames and slats, stained and drying, are propped up on two saw horses outdoors on a gravel surface.

    I then started to assemble the frame using batten screws to have a solid frame, and added the polycarbonate sheet to the front.

    A wooden saw horse standing on a gravel surface outdoors, with a car and another small wooden structure visible in the background. The saw horse appears newly built and sturdy.
    A wooden stand holds three different-sized sieving trays. The structure is set outdoors on a blue tarpaulin, with building materials and trees visible in the background.

    I did not plan the door until the end of the project. I decided to use a good old palette we had in the yard.

    A wooden pallet lies on gravel with two planks, a green power tool, and a yellow spirit level placed on top. An orange safety cone and other pieces of timber are visible in the background.
    A homemade cold frame made of wooden planks and clear plastic panels stands outdoors on two wooden beams, likely for gardening or plant protection. Forest and logs are visible in the background.

    I then covered the rest of the frame and the doors with builder’s plastic and fastened it with staples to the frame. The tip here is to use low force on the staple and to put two staples on top of each other to form a cross to avoid the plastic ripping apart.

    A homemade wooden mini greenhouse with clear plastic panels stands on a porch. Potted plants and trees are nearby, and forested hills can be seen in the background. Sunlight filters through the scene.
    A small wooden glasshouse with transparent plastic panels stands on a porch. The door is open, revealing potted plants and seedlings inside. Sunlight shines on the structure and surrounding greenery.
    A wooden cold frame with transparent plastic panels sits open on a veranda, holding trays of young plants and a pot, with greenery visible in the background.
    A small homemade greenhouse box made of wood and clear plastic sits on a wooden balcony behind a balustrade, with potted plants nearby.
    A small glasshouse with translucent corrugated plastic walls and a slanted roof, allowing sunlight to reach green plants growing inside. The structure is placed outdoors near a building.

    In case it gets too hot inside the mini greenhouse (and it will!), I made it possible to slide both panels on top of the greenhouse to allow hot air to escape. Note though that the middle part is fixed. I used the same railing system sold with the polycarbonate panels and fixed them with small screws. You can see below that the thermometer inside indicates that the internal temperature of the greenhouse was 23 degrees (Celsius) on the day this photo was taken, whilst outside the temperature was only 8 degrees. Even on a cold day, the power of the sun can be harnessed.

    A homemade green house with a transparent, corrugated plastic top sits on a wooden decking, surrounded by plants and greenery in the background.
    A wooden planter box with a transparent plastic cover, partially open to reveal green plants inside, is placed on a veranda overlooking a grassy area and trees.
    Close-up of the corner of a clear corrugated polycarbonate sheet, with sunlight highlighting its texture and internal channels. The background is blurred green foliage and wooden surfaces.
    A close-up of a glass thermometer showing a temperature reading of about 22°C, with sunlight and a blurred outdoor background visible through a window.

    That’s it, here the final result. We have put in our first batch of seedlings and cannot wait until we can transfer our tomato and other summer vegie seedlings from our heat pad set up indoors to this mini greenhouse. But more on that later. In the meantime, we cannot wait for the end of winter so we can get these seedlings into the ground.

    Young green seedlings growing in trays inside a small wooden greenhouse with sunlight shining through clear plastic panels. The seedlings appear healthy and vibrant.
    Young green lettuce plants growing in soil inside a greenhouse, with sunlight streaming through clear, ribbed plastic panels in the background. The leaves are fresh and vibrant, catching the sunlight.

    I hope this may inspire you to create your own mini greenhouse. If you have any questions or photos of your own greenhouse projects, feel free to share them with us on Facebook.

    #greenhouse #plants #garden #gardening #gardeners #gardenlife #gardeninglife #growyourown #growyourownfood #homegrown #vegetablegarden #woodwork #woodworking #tasmania #northerntasmania

  • The upper crust

    The upper crust

    How does the heat pad we use to germinate seed also help us to make the most beautiful homemade bread?

    This is a story all about bread, yet it starts with a device associated with gardeners, not bread-makers. Yes, the humble heat pad. This is an essential item in our home for germinating seed, especially when we try to get a head start on summer crops like tomatoes. And without it, I just would not be able to make bread. Any bread maker who lives in a cold house needs a heat pad! Actually, you will need two other things: a cast iron pot with a lid and time. Bread-making is not a quick process. So gardeners, if you are looking to get more value out of your heat pad, bread-making may just be it!

    A black rectangular heat pad labelled Mr Fothergill’s HEATPAD with instructions for seed raising and plant propagation, placed on a green and white chequered surface.
    A black cast iron casserole dish with its lid off rests on a green and white checked tablecloth, next to a dark wooden chair.

    I will not go through every step involved in making bread from scratch. This is just a quick walkthrough. I have listed some links at the end if you want to know more. For the sourdough starter, you can make it yourself or, my preferred option, ask your local baker for a little bit. After that you are all good to go.

    To keep the sourdough starter alive, you cannot make it more simple. Mix a equal portion of sourdough, water and flour. Easy! And guess what, you do not have to feed it every day. When you are done, give it a last feed when it is active and stuck it in the fridge. You will always be able to resuscitate the starter even after a few months. The starter may be a bit slow, so feed it a few times and do some cooking again, again, and again.

    A glass jar with a small amount of white liquid at the bottom sits on a checked tablecloth. A red square label is attached to the lower outside of the jar.
    A glass jar containing a creamy white substance sits on a green and white chequered tablecloth, with a faint plant visible in the blurred background.

    Here you can see the sourdough going from small to big in 2 feeds just 24 hours apart.

    When the sourdough is active, this is the time to start to mix the ingredients for making bread. You need to follow what we call ‘Baker’s percentage’. For my bread, I use these percentages:

    • 100% flour
    • 75% to 80% water
    • 20% sourdough
    • 2% salt

    I use 1 kilogram of floor (600 grams white and 400 grams wholemeal). Therefore, I add 750-800 grams of water, 200 grams of sourdough starter and 2 grams of salt. Sorted! Mix all the ingredients roughly and let it rest for an hour on the heat pad.

    Remember … the heat pad is the secret weapon to success here!

    A metal mixing bowl with bread dough inside sits on a digital kitchen scale atop a green and white checked tablecloth.
    A bowl covered with a red and white chequered cloth is sitting on a black warming pad atop a green and white chequered tablecloth.

    After that period of rest, you then knead the dough. The dough will be sticky and messy. However, do not give up! After ten minutes of kneading, the dough should be all right (mate!). Another tip, use a scraper in one hand and think of it as a non-sticky hand.

    After the kneading, fold the dough into itself every half an hour for 3 to 4 hours, then let it sit for another 3 to 4 hours. During this time, place the dough back on the heat pad when you are not working it. This is when the magic happens. Watch the dough start to double in size.

    It is now time to shape the dough. Cut it in two pieces and fold the dough into itself. Do not go too hard; you want to keep the fluffiness and airiness of the dough. Make it a nice ball and put it in a shaping basket which you have lightly dusted with flour first. You can buy a specially made shaping basket or just use any bowl. If using a bowl, and not a shaping basket, place a dry towel inside it first to prevent the dough sticking to it during this time. Do not be shy with the flour because you do not want to ruin your work with the dough sticking to the basket. And if you like, add some sesame seeds for the perfect loaf. Roll the dough in a plate with these seeds.

    After this, the dough will undergo a second fermentation. I like to put it in the fridge for a night or two. Or wait another 3 to 4 hours.

    And the last part: the baking. Take the dough out of the fridge a hour before you want to bake it. In the meantime, place the cast iron pot in your oven which you have turned on full blast, as high as you can. After that, score the dough with a sharp implement. Any razor blade will do. Do not use a knife if you want a clean cut. Have fun with it, it is a baker’s signature. When people were baking in the oven of the village, this is how they recognised their bread, i.e. by their markings.

    Put the bread in the cast iron pot for 20 minutes with the lid on and then another 20 minutes without the lid. And voila! Your bread is baked! And it has the most beautiful crust that you could imagine, thanks its time in the heated cast iron pot.

    This bread can be kept in a cool, shady cupboard for up to one week. That is, if nobody eats it first!

    A round loaf of rustic bread, cut in half, sits on a wooden chopping board atop a green and white checked tablecloth. The bread has a crisp, browned crust and an airy, textured interior.

    Enjoy!

    Here are two very useful links that have helped me a lot in my bread-making journey.

    https://www.ilovecooking.ie/features/sourdough-bread-masterclass-with-patrick-ryan

    #levain #breadmaking #bread #sourdough #breadbaking #baking #sourdoughbread #breadlover #homemade #homemadebread #food #artisanbread #realbread #bakery #foodphotography #sourdoughbaking #wildyeast #breads #sourdoughstarter #homebaker #baker #homebaking #gardener #gardening #garden #gardenlife #nature #gardens #growyourown #growyourownfood #vegetablegarden #gardeners #homegrown #propagation #germination

  • Making of a Jewel

    Making of a Jewel

    A digital artwork of a potted plant, with half of the plant depicted in realistic colours and the other half as a wireframe model, showcasing a blend of 3D modelling and realistic illustration.

    Recently I have been working on my 3D skills. I would like to show you the process that I take to develop each of my 3D models, using the example of one of the most amazing plants I have seen. This plant is Macodes petola, also known as the Jewel Orchid. Nature is amazing! I am always surprised by the form and shape you can find in it.

    A collage of images showing jewel orchids with green leaves and bright yellow veins, including close-up photos, potted plants, and vintage botanical illustrations.

    First of all you need to find some reference images. I recommend the free program PureRef. Just drag and drop any images from the web or your computer and organise your own pin board.

    After that you can start modelling in 3D. I use Blender, a fully open-source 3D software as it is as powerful as most of the commercial programs.

    A 3D modelling software interface displays a leaf model; one leaf is shown with a wireframe mesh, while two others display detailed vein textures. Various modelling tools and settings are visible around the workspace.
    A 3D modelling software interface shows three wireframe spoon models from different angles, with tool panels and options visible on the right and top sides of the screen.
    A computer screen shows a 3D modelling software interface with a wireframe model of a plant, featuring several large leaves. The workspace and tool panels are visible around the model.
    A collage of five decorative bowls, four of which have small sculpted feet as bases. The bowls vary in colour and material, including red and brown clay and a decorated metallic bowl.

    You now need a pot for your indoor plant. And a special plant needs a special pot. I found this old pot with human feet made by the Egyptians in the Predynastic Period (ca. 3900–3650 B.C)

    I then modelled the pot using the same process that I used for the plant itself, i.e. in Blender.

    A 3D modelling software interface displays a red clay-style bowl with two cartoonish feet. Various toolbars, menus, and editing panels are visible on the sides of the workspace.
    A 3D modelling software interface shows a partially sculpted red-brown character with a bowl-shaped upper body and two animal-like legs and feet, displayed on a grid background. Various tool panels are open on the sides.

    When you have completed your 3D modelling, you can start the really fun part: texturing. Let’s bring life to the clay. For this you need to unwrap your 3D shape on a flat surface because the textures are in 2D. Then you can ‘paint’ the shape with the texture you want.

    A computer screen shows a 3D modelling software with a leaf model on the right and its UV map layout with highlighted edges and green textures on the left. Software tool options are visible on the right side.
    A 3D modelling software interface displaying a UV map of a circular object with grid lines on the left, and a textured 3D model of a round stone pedestal on the right, along with modelling tools and settings.
    A 3D modelling workspace in Blender shows a textured model of a round, footed bowl resembling animal legs, with green moss or algae inside. Various editing panels and tools are visible on the screen.
    A 3D modelling workspace in Blender shows a plant model with green wireframe-highlighted leaves. Various editing panels, tools, and settings are visible around the main viewport.

    And finally we come to the rendering part. This is when you take a picture of your finished model and incorporate it into an environment that you like with appropriate lighting. For this render, I chose to put the plant on a stand in a museum.

    A small green plant with patterned leaves in a dark brown, foot-shaped pot sits on a black plinth against a dark background with wooden flooring.
    A potted plant with green leaves featuring white patterns is placed in a brown, round pot shaped like an animal with four legs, displayed on a plinth against a plain white background.
    A potted plant with large, glowing green, vein-patterned leaves sits in a round brown pot designed with two feet, displayed on a plinth against a dark background.
    A close-up of a plant with three glowing green leaves featuring intricate vein patterns, set against a solid black background. The image has a bright, almost neon effect with a small logo reading Inwardout Studio in the corner.

    And the good thing with 3D plants is they don’t need too much care, they are living in the cloud.

    https://cc553bc7-bdf6-4be5-91fe-23e4cbc251ef.usrfiles.com/html/2b2e4b_d767b483cae16e027c4ea8ac7906fbf4.html

    #blender #3Dmodeling #3Dplant #macodespetola #jewelorchid #indoorplant

  • Breaking ground!

    Breaking ground!

    This week, we finally broke ground on a project that we have been working on over the last couple of months! Excavation works started so that our client can realise the enclosed raised garden beds and compost bays that you can see in Ludovic’s plan below.

    3D illustration of a person standing in a structure with curved roofs and several rectangular planting beds inside and outside, with a compass symbol on a flat, grey surface.

    3D render of the raised garden beds and enclosure designed by Ludovic, with compost bays below.

    Looking at the plans you may be forgiven for thinking that this is more like a prison potager than a productive garden for a free-spirited local who loves her cooking. However, with plenty of possums, quolls, wallabies, pademelons and even deer residing in the neighbourhood, these tough measures are necessary to ensure our client gets to eat her produce!

    A panoramic view of a grassy, overgrown garden bordered by rocks and surrounded by dense trees; two people stand near the centre, with a wooden shed and house visible on opposite sides.

    The garden on our first site visit

    A yellow digger sits on a cleared, dirt construction site surrounded by trees and vegetation under a partly cloudy blue sky.

    Excavation to level out the garden for the raised garden bed enclosure. The compost bays will be built below.

    You may be wondering “Why the raised beds?”. Our client loves her new home and wants to stay there. She is thinking long-term. As she ages, she would like to keep gardening so wanted an option that was a little easier on the back and the knees. And there is another important reason why we designed this garden to be raised. Take one look at the next photo and you may be able to guess what that reason is!

    A small, round water-filled hole surrounded by grass and bare soil, with stones scattered nearby and clouds reflected on the water's surface.

    Clay sub-soils on site are not exactly free-draining and would require extensive remediation. Putting any plant in this environment would see its roots drowned. Raised garden beds are one way of overcoming this problem.

    This excavation was definitely not a whole-scale clearing of the site, although it may look like that from the photos above. The rocks in the foreground have been retained and re-positioned along the western edge of the yard. Our client’s beloved Mountain Pepper (Tasmannia lanceolata) was carefully lifted by the excavator and temporarily planted in a ‘safe site’ to the top of the yard until the garden is finished. The Japanese Maple (Acer palmatum) below takes pride of place in front of the kitchen window. Its leaves turn a beautiful red colour in autumn.

    A sunlit garden with large rocks, a green leafy tree, small ferns, gravel path, and a cleared earth area, with a dense forest in the background under a blue sky.

    This Japanese Maple is one of our client’s favourite plants in the garden. So it is definitely staying!

    Well it has been a big week in this particular garden. So it is time for us to take a little break over the weekend. Stay tuned over the coming weeks as Ludovic commences construction of the raised garden beds and compost bays.

    A bientôt!

  • Digital plants

    Digital plants

    Today, we are happy to show you another part of what we can do at Inwardout Studio … ‘digital’ plants!

    If you are an architect, interior designer or horticulturist seeking different ways to visualise your concepts, you may want to check out our new collection of ‘digital’ plants. We have started to build these 3D models for use in our visualisation.

    You can view our collection online on Sketchfab or check out a few examples below.

    Two kokedama moss balls with green ferns growing from them hang by strings in front of a bright window background.

    Kokedama and Lemon Button Fern

    https://cc553bc7-bdf6-4be5-91fe-23e4cbc251ef.usrfiles.com/html/2b2e4b_d767b483cae16e027c4ea8ac7906fbf4.html

    Kokedama dreaming!

    Hanging colourful string planters with green leafy plants are suspended from the ceiling against a brick wall; each planter is illuminated by vibrant blue, green, purple, and yellow lights.

    Kokedama with Epipremnum ‘Aureum’

    https://cc553bc7-bdf6-4be5-91fe-23e4cbc251ef.usrfiles.com/html/2b2e4b_d767b483cae16e027c4ea8ac7906fbf4.html

    Three spherical hanging planters with green leafy vines are suspended against a plain light-coloured background. The plants appear healthy, with vines cascading down from the moss-covered balls.

    Kokedama with Epipremnum ‘Aureum’

    And of course, last but not least: Terry the Taro!

    https://cc553bc7-bdf6-4be5-91fe-23e4cbc251ef.usrfiles.com/html/2b2e4b_d767b483cae16e027c4ea8ac7906fbf4.html

    Feel free to contact us anytime if you have any special requests for new plants to add to our collection.

    And keep looking on our Sketchfab page, as we will add one new plant there every week.

  • Poly tunnels on a budget

    Poly tunnels on a budget

    Last week, on a beautiful Saturday morning, I drove 20 minutes north-west of Launceston to attend a workshop on Poly Tunnels. It took place at Tasmanian Natural Garlic & Tomatoes, Nevil Reed’s farm in Selbourne. Nevil grows hundreds of varieties of tomato in his poly tunnels.

    A plastic-covered polytunnel with open doors, showing plants and containers inside. Two people stand outside on the grass under a clear blue sky. Trees and a green building are visible in the background.
    A group of people stand outside a large glasshouse with a plastic covering, observing and taking notes on a sunny day with a clear blue sky and trees in the background.

    Nevil has been researching, designing and building poly tunnels for the last nine years. His tunnels are all low cost, durable designs, aimed at mitigating against a variety of weather extremes.

    The main reasons why you would like to build a poly tunnel is that you can extend your growing season, have better fruit earlier and longer, and also be able to grow more varieties of plants. On the other hand, because of the closed environment you will create, a little problem in your garden can become a big problem inside the poly tunnel. So you will have to monitor what happens a lot more and react a lot quicker.

    There are a lot of different possibilities when it comes to choosing the kind of construction that you want. Like anything, cost is the big issue and also the durability of your construction. Do you want post and concrete in your garden? In any case you will have to brace your structure.

    A large white glasshouse with a rounded roof stands on a grassy field under a bright blue sky with scattered clouds. Trees are visible in the background.
    Inside view of a polytunnel with plastic covering, arched metal supports, and raised soil beds with plants growing along the centre. Sunlight filters through the translucent roof.
    A row of large, white, arched polytunnels stands on a grassy field under a clear blue sky, with trees visible in the background.
    A plastic-covered polytunnel stands on green grass under a clear blue sky, with trees visible in the background.
    A large, white, plastic-covered polytunnel stands on a grassy field under a clear blue sky. An orange traffic cone and a small bucket are on the grass near the entrance.
    A person adjusts the support structures of a transparent greenhouse tunnel, which covers rows of green plants on a sunny day with clear blue sky and surrounding trees.
    A large, white, dome-shaped glasshouse structure stands outdoors on green grass, with a clear blue sky above. The glasshouse is secured with ropes and has some plants visible inside at the top.
    Close-up of a blue and white rope tied in a knot around a green metal post, securing a sheet of clear plastic. The ground is covered with green grass and clover.

    First thing to consider is the plastic. It needs to be UV stabilized and light enough to work with. For the thickness, choose 180UM instead of the 150UM. You do not want clear plastic. The more the light is diffuse, the better (70% to 80% is fine).

    You also have to choose between poly or steel for the arches. The advantage of the poly is this is easy to bend and work with. If you choose to go for a tunnel with post, the steel will be the way to go. In a more lighter version using the poly, Nevil recommends using steel at both ends and tightening all the hoops at the ridge for better stability.

    A blue and yellow rope tied around a large black pipe with green stripes, set against a clear blue sky.
    A person stands in a garden with metal arches and rows of plants, adjusting or inspecting the structure. Two polytunnel greenhouses are visible in the background, set against a clear blue sky and trees.

    The temperature inside a poly tunnel can be very high. Being able to control the air flow when needed is crucial. The side of the tunnel needs to be open almost every morning. The higher your tunnel, the easier it is to control the temperature inside the poly tunnel.

    A side view of a greenhouse with clear plastic sheeting, wooden supports, and a metal pipe; leafy green plants are visible both inside and outside the structure under bright sunlight.
    A view from inside a greenhouse with a partially open roof vent, showing clear plastic panels and a tomato plant with yellow flowers reaching towards the opening. Blue sky is visible through the vent.
    A person adjusts the plastic covering on a polytunnel in a sunny outdoor garden, with green grass and trees visible in the background.

    If you feel uncomfortable inside the poly tunnel, most likely your plants will too!

    There is a lot more to say on this topic. If you have any questions or are interested in attending a similar workshop, please contact Nevil directly.

  • Birth of a cube

    Birth of a cube

    Hi all, we are almost here and the cube we have designed for Blooming Tasmania’s Flower and Garden Festival is ready. It just needs a bit of love and then it is done.

    Before the result, I want to show you the start of this idea. First the concept, the cube, our logo. Yes I am an architect and I love cubes of course. How can you work with this shape? This is probably the first exercise in any school of architecture. So this is our starting point: the cube as an infinite shape, the base of a lot of fractal geometry, the cube in the cube and so on. Our cube concept is based on the Menger sponge.

    Five cubic structures are shown in a row, each progressively more complex, with increasingly intricate square holes carved through them, illustrating the stages of a fractal called the Menger Sponge.

    The Menger sponge (Image: WIkipedia)

    Secondly, how to go in and out of the cube, how to unfold it? That is when the second concept of a geometric ribbon comes into play.

    A 3D-printed geometric structure with intersecting rectangular beams and square openings, placed on a wooden surface. The structure has a central hollow cube with extended horizontal pieces on each side.
    A black, zigzag-shaped object stands upright on a brown surface, with cardboard pieces and a patterned rug visible in the background.
    A cardboard sculpture is arranged on a textured surface to create the optical illusion of an impossible geometric shape, resembling a Penrose triangle. The sculpture casts a shadow that enhances the illusion.

    For making this cube come to life, we decided to use plywood. This is a very versatile material. It is inexpensive, easy to cut and being flat, so easy to transport.

    Several wooden pieces are laid out on the ground in front of a garage, along with two assembled wooden stools. There are plants and a hanging green dress in the background.
    A wooden, L-shaped studio desk with built-in shelves and the words Anwandter Studio carved on the front, stands in a cosy, eclectic room with various art supplies and furniture in the background.
    Several interlocking plywood pieces are assembled into an abstract, geometric structure on a cracked concrete surface, with more wooden pieces and tools visible in the background.

    To make the components of the cube, all the design was generated in CAD and then cut via a CNC router.

    Three rectangular sheets of wood with laser-cut shapes and pieces arranged to maximise material use. Each sheet has a yellow circular label with black markings in the upper half of the panel.
    An exploded view of a wooden puzzle box with several flat, interlocking pieces spread out, revealing how they fit together. One piece is labelled Innovation Studio.

    And the plants! The cube is a kind of a big pot for plants, inside the cube (900 x 900 x 900mm) there are 27 smaller cubes (each 300 x 300 x 300mm). And all of this will be filled (with love).

    A modern plant display with wooden stools, potted plants on stands, a wooden counter labelled In n out Studio, and a vertical planter on a grey and black background. A bright red pot sits in front.

    We had some space left in the sheets of plywood, so we also designed stools and standing planters. This is another story. I will tell it to you the next time. And you will also hear more from Gabrielle about plant selection soon.

    A bientôt,